repl.it linkWeek 3 [Aug 26] - Topics
- [W3.1] Java: Useful Classes
-
[W3.1a] C++ to Java → Some Useful Classes → Java API
-
[W3.1b] C++ to Java → Some Useful Classes → The
StringClass -
[W3.1c] C++ to Java → Some Useful Classes → Wrapper Classes for Primitive Types
-
[W3.1d] C++ to Java → Some Useful Classes → The
Arraysclass -
[W3.1e] C++ to Java → Some Useful Classes → The
Scannerclass
- [W3.2] Git: Remote Repos
- [W3.3] IDE: Basic Features
C++ to Java → Some Useful Classes → Java API
Can use Java API documentation about classes
Java comes with a rich collection of classes that you can use. They form what is known as the Java API (Application Programming Interface). Each class in the API comes with documentation in a standard format.
C++ to Java → Some Useful Classes → The String Class
Can use the String class
String is a built-in Java class that you
Any class in the java.lang package can be used without importing.
Find characters of a string
Strings provide a method named charAt, which extracts a character. It returns a char, a primitive type that stores an individual character (as opposed to strings of them).
String fruit = "banana";
char letter = fruit.charAt(0);
The argument 0 means that we want the letter at position 0. Like array indexes, string indexes start at 0, so the character assigned to letter is 'b'.
You can convert a string to an array of characters using the toCharArray method.
char[] fruitChars = fruit.toCharArray()
Change a string to upper/lower case
Strings provide methods, toUpperCase and toLowerCase, that convert from uppercase to lowercase and back.
After these statements run, upperName refers to the string "ALAN TURING" but name still refers to "Alan Turing".
String name = "Alan Turing";
String upperName = name.toUpperCase();
System.out.println(name);
System.out.println(upperName);
Alan Turing
ALAN TURING
Note that a string method cannot change the string object on which the method is invoked, because strings are toUpperCase on a string "abc", you get a new string object "ABC" as the return value rather than the string "abc" being changed to "ABC". As a result, for such string methods that seemingly modify the string but actually return a new string instead e.g., toLowerCase, invoking the method has no effect if you don’t assign the return value to a variable.
String s = "Ada";
s.toUpperCase(); // no effect
s = s.toUpperCase(); // the correct way
Replacing parts of a string
Another useful method is replace, which finds and replaces instances of one string within another.
This example replaces "Computer Science" with "CS".
String text = "Computer Science is fun!";
text = text.replace("Computer Science", "CS");
System.out.println(text);
CS is fun!
Accessing substrings
The substring method returns a new string that copies letters from an existing string, starting at the given index.
"banana".substring(0)"banana""banana".substring(2)"nana""banana".substring(6)""
If it’s invoked with two arguments, they are treated as a start and end index:
"banana".substring(0, 3)"ban""banana".substring(2, 5)"nan""banana".substring(6, 6)""
Searching within strings
The indexOf method searches for a single character (or a substring) in a string and returns the index of the first occurrence. The method returns -1 if there are no occurrences.
"banana".indexOf('a')1"banana".indexOf('a', 2)3searches for'a', starting from position 2"banana".indexOf('x')-1"banana".indexOf("nan")2searches for the substring"nan"
Comparing Strings
To compare two strings, it may be tempting to use the == and != operators.
String name1 = "Alan Turing";
String name2 = "Ada Lovelace";
if (name1 == name2) {                 // wrong!
    System.out.println("The names are the same.");
}
This code compiles and runs, and most of the time it gets the answer right. But it is not correct, and sometimes it gets the answer wrong. The problem is that the == operator checks whether the two variables refer to the same object (by comparing the references). If you give it two different strings that contain the same letters, it yields false.
The right way to compare strings is with the equals method.
This example invokes equals on name1 and passes name2 as an argument. The equals method returns true if the strings contain the same characters; otherwise it returns false.
if (name1.equals(name2)) {
    System.out.println("The names are the same.");
}
If the strings differ, we can use compareTo to see which comes first in alphabetical order. The return value from compareTo is the difference between the first characters in the strings that differ. If the strings are equal, their difference is zero. If the first string (the one on which the method is invoked) comes first in the alphabet, the difference is negative. Otherwise, the difference is positive.
In this example, compareTo returns positive 8, because the second letter of "Ada" comes before the second letter of "Alan" by 8 letters.
int diff = name1.compareTo(name2);
if (diff == 0) {
    System.out.println("The names are the same.");
} else if (diff < 0) {
    System.out.println("name1 comes before name2.");
} else if (diff > 0) {
    System.out.println("name2 comes before name1.");
}
Both equals and compareTo are case-sensitive. The uppercase letters come before the lowercase letters, so "Ada" comes before "ada". To check if two strings are similar irrespective of the differences in case, you can use the equalsIgnoreCase method.
String s1 = "Apple";
String s2 = "apple";
System.out.println(s1.equals(s2)); //false
System.out.println(s1.equalsIgnoreCase(s2)); //true
Some more comparison-related String methods:
contains: checks if one string is a sub-string of the other e.g.,SnappleandappstartsWith: checks if one string has the other as a substring at the beginning e.g.,AppleandAppendsWith: checks if one string has the other as a substring at the end e.g.,Crabandab
Printing special characters (line breaks, tabs, ...)
You can embed a special character e.g., line break, tab, backspace, etc. in a string using an escape sequence.
| Escape sequence | meaning |
|---|---|
\n |
newline character |
\t |
tab character |
\b |
backspace character |
\f |
form feed character |
\r |
carriage return character |
\" |
" (double quote) character |
\' |
' (single quote) character |
\\ |
\ (back slash) character |
\uDDDD |
character from the Unicode character set, by specifying the Unicode as four hex digits in the place of DDDD |
An example of using escape sequences to printing some special characters.
System.out.println("First line\nSecond \"line\"");
First line
Second "line"
As the behavior of the \n depends on the platform, the recommended way to print a line break is using the System.lineSeparator() as it works the same in all platforms.
Using System.lineSeparator() to print a line break.
System.out.println("First line" + System.lineSeparator() + "Second line");
First line
Second line
String formatting
Sometimes programs need to create strings that are formatted a certain way. String.format takes a format specifier followed by a sequence of values and returns a new string formatted as specified.
The following method returns a time string in 12-hour format. The format specifier \%02d means “two digit integer padded with zeros”, so timeString(19, 5) returns the string "07:05 PM".
public static String timeString(int hour, int minute) {
    String ampm;
    if (hour < 12) {
        ampm = "AM";
        if (hour == 0) {
            hour = 12;  // midnight
        }
    } else {
        ampm = "PM";
        hour = hour - 12;
    }
    return String.format("%02d:%02d %s", hour, minute, ampm); // returns "07:05 PM"
}
Implement the printPrice method in the code below to produce the given output. Its behavior:
- The parameter
itemis a string in the formatname--$pricei.e., a name and a price of an item separated using a--e.g.,banana--$3/50 - It prints the
NAME: pricewhere the name is in upper case. The price does not have a$sign and has.in place of the/
e.g.,banana--$3/50BANANA: 3.50 - The
namepart of the input can have trailing/leading spaces which should be omitted from the output.
e.g.,banana --$3/50BANANA: 3.50
Do a Web search to find how to remove leading/trailing spaces. Suggested search terms java string remove leading trailing spaces
public class Main {


    public static void printPrice(String item) {
        // TODO: add your code here

    }

    public static void main(String[] args) {
        printPrice("sandwich  --$4/50");
        printPrice("  soda --$10/00");
        printPrice("  fries --$0/50");
    }
}
SANDWICH: 4.50
SODA: 10.00
FRIES: 0.50
Partial solution:
public static void printPrice(String item) {
    int dividerPosition = item.indexOf("--");
    String itemName = item.substring(0, dividerPosition);
    //...
    System.out.println(itemName.trim().toUpperCase() + ...);

}
C++ to Java → Some Useful Classes → Wrapper Classes for Primitive Types
Can use wrapper classes for primitive
Primitive values (like int, double, and char) do not provide methods.
For example, you can’t call equals on an int:
int i = 5;
System.out.println(i.equals(5));  // compiler error
But for each primitive type, there is a corresponding class in the Java library, called a wrapper class. The wrapper classes the various primitive types are given in the table below. They are in the java.lang package, so you can use them without importing them.
| Primitive type | Wrapper class |
|---|---|
byte |
Byte |
short |
Short |
int |
Integer |
long |
Long |
float |
Float |
double |
Double |
char |
Character |
boolean |
Boolean |
Double d = new Double(2.5);
int i = d.intValue();
System.out.println(d);
System.out.println(i);
2.5
2
Each wrapper class defines constants MIN_VALUE and MAX_VALUE. Because these constants are available in wrapper classes, you don’t have to remember them, and you don’t have to include them in your programs.
Accessing max and min values for integers:
System.out.println(Integer.MIN_VALUE + " : " + Integer.MAX_VALUE);
-2147483648 : 2147483647
Wrapper classes provide methods for converting strings to other types. In this context, parse means something like “read and translate”. Integer.parseInt converts a string to (you guessed it) an integer. The other wrapper classes provide similar methods, like Double.parseDouble and Boolean.parseBoolean.
Integer.parseInt("1234") 1234
Wrapper classes also provide toString, which returns a string representation of a value.
Integer.toString(1234) "1234"
Implement the printTotalScore method in the code below to produce the given output. Its behavior:
valuesis an array of strings, each string representing an integer e.g.,["5", "-1"]- The method prints the total of the numbers represented by the strings in the array
["5", "-1"]4
public class Main {

    public static void printTotalScore(String[] values){
        // TODO: add your code here
    }

    public static void main(String[] args) {
        printTotalScore(new String[]{});
        printTotalScore(new String[]{"0", "124", "-15"});
    }
}
0
109
You can use the Integer.parseInt() method to convert a String to the equivalent int value.
Partial solution:
public static void printTotalScore(String[] values){
    int total = 0;
    for (String value: values){
        // convert the value to an int and add to the total
    }
    System.out.println(total);
}
C++ to Java → Some Useful Classes → The Arrays class
Can use the Arrays class
java.util.Arrays provides methods for working with arrays. One of them, toString, returns a string representation of an array. It also provides a copyOf that copies an array.
Using Arrays.copyOf and Arrays.toString:
int[] a = new int[]{1,2,3,4};

int[] b = Arrays.copyOf(a, 3); // copy first three elements
System.out.println(Arrays.toString(b));

int[] c = Arrays.copyOf(a, a.length); // copy all elements
System.out.println(Arrays.toString(c));
[1, 2, 3]
[1, 2, 3, 4]
Implement the following two methods in the code below to produce the given output.
filterEmailsfilterEmails(String[] items): String[]itemsis an array of strings each of which may be an email address or some other random string- Returns a
String[]containing email addresses that were initems. Any string containing@is considered as an email.
["aaa@bbb", "xyz"]["aaa@bbb"]
printItems(String[] items)- Prints
itemsin the standard array format. e.g.,["aaa", "bbb"][aaa, bbb]
- Prints
import java.util.Arrays;

public class Main {
    public static String[] filterEmails(String[] items){
        // TODO: add your code here
    }

    public static void printItems(String[] items){
        // TODO: add your code here
    }

    public static void main(String[] args) {
        printItems(filterEmails(new String[]{}));
        printItems(filterEmails(new String[]{"abc"}));
        printItems(filterEmails(new String[]{"adam@example.com", "aab", "john@example.com", "some@"}));
        printItems(filterEmails(new String[]{"xyz", "@bee.com", "aab"}));
    }
}
[]
[]
[adam@example.com, john@example.com, some@]
[@bee.com]
filterEmailsfilterEmails(String[] items): String[]- create a new array (say
emails) of the same size asitems - go through the elements in the
itemsand add toemailsif the element contains@(you can use thecontainsmethod of theStringclass here) - Use
Arrays.copyOfmethod to return the filled part ofemails.
- create a new array (say
printItems(String[] items)- You can use the
Arrays.toString()method for this.
- You can use the
public static String[] filterEmails(String[] items){
    String[] results = new String[items.length];
    int matchCount = 0;
    for(String item: items){
        if (item.contains("@")){
           //...
        }
    }
    return Arrays.copyOf(results, matchCount);
}

public static void printItems(String[] items){
    System.out.println(Arrays.toString(items));
}
C++ to Java → Some Useful Classes → The Scanner class
Can use the Scanner class
Scanner is a class that provides methods for inputting words, numbers, and other data. Scanner provides a method called nextLine that reads a line of input from the keyboard and returns a String. The following example reads two lines and repeats them back to the user:
import java.util.Scanner;

public class Echo {

    public static void main(String[] args) {
        String line;
        Scanner in = new Scanner(System.in);

        System.out.print("Type something: ");
        line = in.nextLine();
        System.out.println("You said: " + line);

        System.out.print("Type something else: ");
        line = in.nextLine();
        System.out.println("You also said: " + line);
    }
}
Scanner class normally reads inputs as strings but it can read in a specific type of input too.
The code below uses the nextInt method of the Scanner class to read an input as an integer.
Scanner in = new Scanner(System.in);

System.out.print("What is your age? ");
int age = in.nextInt();
in.nextLine();  // read the newline character the user enters following the integer
System.out.print("What is your name? ");
String name = in.nextLine();
System.out.printf("Hello %s, age %d\n", name, age);
Write a program to ask the user for a description of overseas expenses (presumably, the user has just returned from an overseas trip) and calculate the total in local currency.
- The conversion rate from overseas currency to local currency : overseas
$1.0= local$1.70 - The user can describe expenses is in free form text, as one line. The program takes all amounts mentioned in the format
$amounte.g.,$1.50
Here is one example output:
Your expenses while overseas?beer $4.50 books $3.00 $5.00 for food, that's all
Expenses in overseas currency:[$4.50, $3.00, $5.00]
Total in local currency: $21.25
Here is another:
Your expenses while overseas?nothing. I lived off my friends all the time.
Expenses in overseas currency:[]
Total in local currency: $0.00
One more:
Your expenses while overseas? Just $10
Expenses in overseas currency:[$10]
Total in local currency: $17.00
Here's the skeleton code to use as the starting point:
public class Main {

    // You can add more methods here

    public static void main(String[] args) {
        String line;
        Scanner in = new Scanner(System.in);

        System.out.print("Your expenses while overseas?");
       // TODO: add your code here
    }
}
You can use the split method of the String class to convert a sentence into an array of words. e.g.,
String sentence = "hello my dear";
String[] words = sentence.split(" "); // split using the space as the delimiter
System.out.println(Arrays.toString(words));
[hello, my, dear]
You can use String.format("%.2f", doubleValue) to format doubleValue to two decimal points.
e.g., String.format("%.2f", 1.3334) 1.33
import java.util.Arrays;
import java.util.Scanner;

public class Main {

    public static String[] filterAmounts(String sentence) {
        String[] words = sentence.split(" ");
        String[] result = new String[words.length];
        int wordCount = 0;
        for (String word : words) {
            if (word.startsWith("$")) {
                result[wordCount] = word;
                wordCount++;
            }
        }
        return Arrays.copyOf(result, wordCount);
    }

    public static void main(String[] args) {
        String line;
        Scanner in = new Scanner(System.in);

        System.out.print("Your expenses while overseas?");
        line = in.nextLine();

        String[] amounts = filterAmounts(line);
        System.out.println("Expenses in overseas currency:" + Arrays.toString(amounts));
        double total = 0;
        for (String amount : amounts) {
            // convert amount to double, multiply by currency conversion rate, and add to total
        }
        System.out.println("Total in local currency: $" + String.format("%.2f", total));

    }
}
Project Management → Revision Control → Remote Repositories
Can explain remote repositories
Remote repositories are copies of a repo that are hosted on remote computers. They are especially useful for sharing the revision history of a codebase among team members of a multi-person project. They can also serve as a remote backup of your code base.
You can clone a remote repo onto your computer which will create a copy of a remote repo on your computer, including the version history as the remote repo.
You can push new commits in your clone to the remote repo which will copy the new commits onto the remote repo. Note that pushing to a remote repo requires you to have write-access to it.
You can pull from the remote repos to receive new commits in the remote repo. Pulling is used to sync your local repo with latest changes to the remote repo.
While it is possible to set up your own remote repo on a server, an easier option is to use a remote repo hosting service such as GitHub or BitBucket.
A fork is a remote copy of a remote repo. If there is a remote repo that you want to push to but you do not have write access to it, you can fork the remote repo, which gives you your own remote repo that you can push to.
A pull request is mechanism for contributing code to a remote repo. It is a formal request sent to the maintainers of the repo asking them to pull your new code to their repo.
Here is a scenario that includes all the concepts introduced above (click on the slide to advance the animation):
Tools → Git and GitHub → Clone
Can clone a remote repo
Clone the sample repo samplerepo-things to your computer.
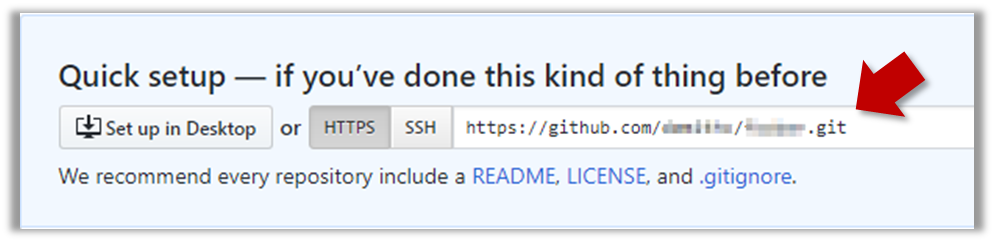
Note that the URL of the Github project is different form the URL you need to clone a repo in that Github project. e.g.
Github project URL: https://github.com/se-edu/samplerepo-things
Git repo URL: https://github.com/se-edu/samplerepo-things.git (note the .git at the end)
File → Clone / New… and provide the URL of the repo and the destination directory.
You can use the clone command to clone a repo.
Follow instructions given here.
Tools → Git and GitHub → Pull
Can pull changes from a repo
Clone the sample repo as explained in
Delete the last two commits to simulate cloning the repo 2 commits ago.
Clone
Can clone a remote repo
Clone the sample repo samplerepo-things to your computer.
Note that the URL of the Github project is different form the URL you need to clone a repo in that Github project. e.g.
Github project URL: https://github.com/se-edu/samplerepo-things
Git repo URL: https://github.com/se-edu/samplerepo-things.git (note the .git at the end)
File → Clone / New… and provide the URL of the repo and the destination directory.
You can use the clone command to clone a repo.
Follow instructions given here.
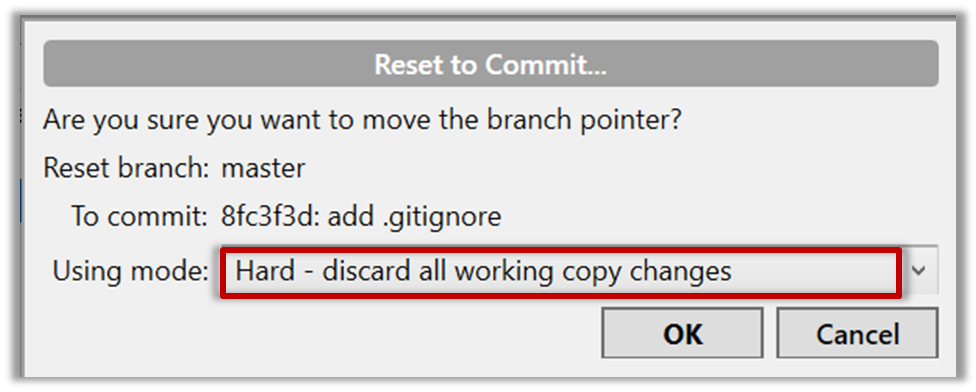
Right-click the target commit (i.e. the commit that is 2 commits behind the tip) and choose Reset current branch to this commit.

Choose the Hard - … option and click OK.
This is what you will see.
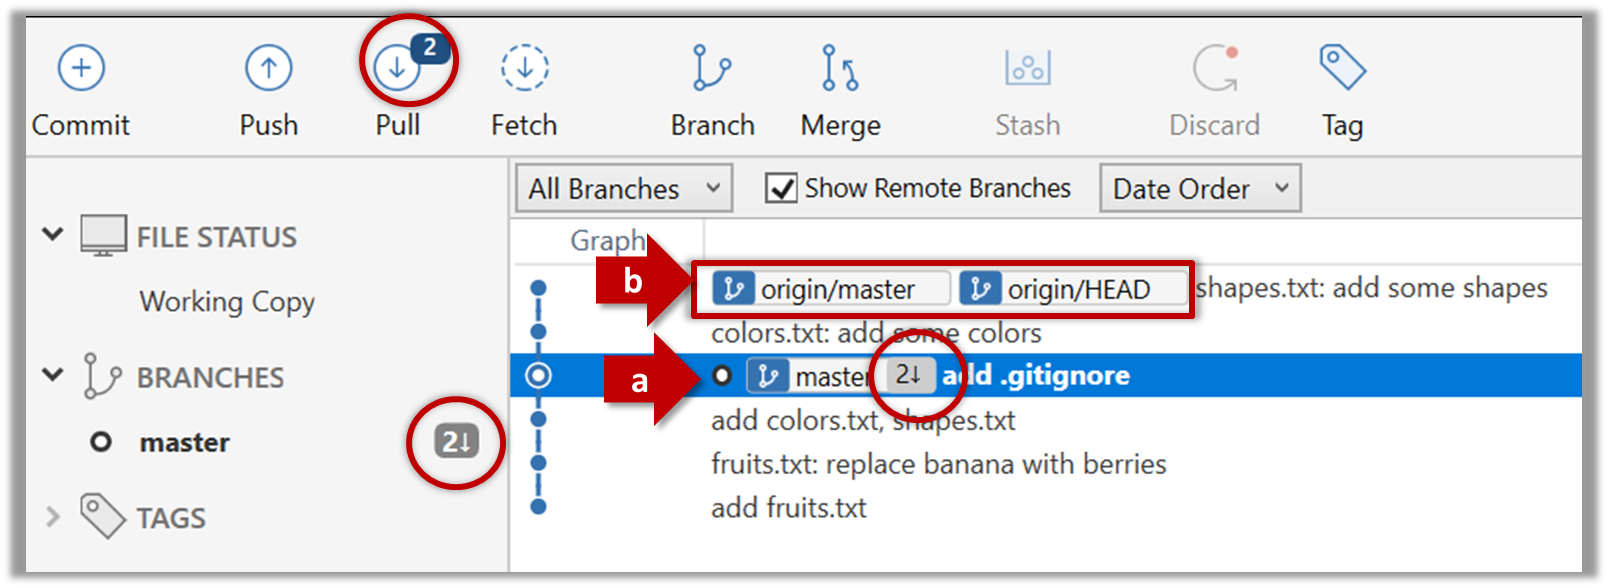
Note the following (cross refer the screenshot above):
Arrow marked as a: The local repo is now at this commit, marked by the master label.
Arrow marked as b: origin/master label shows what is the latest commit in the master branch in the remote repo.
Use the reset command to delete commits at the tip of the revision history.
git reset --hard HEAD~2
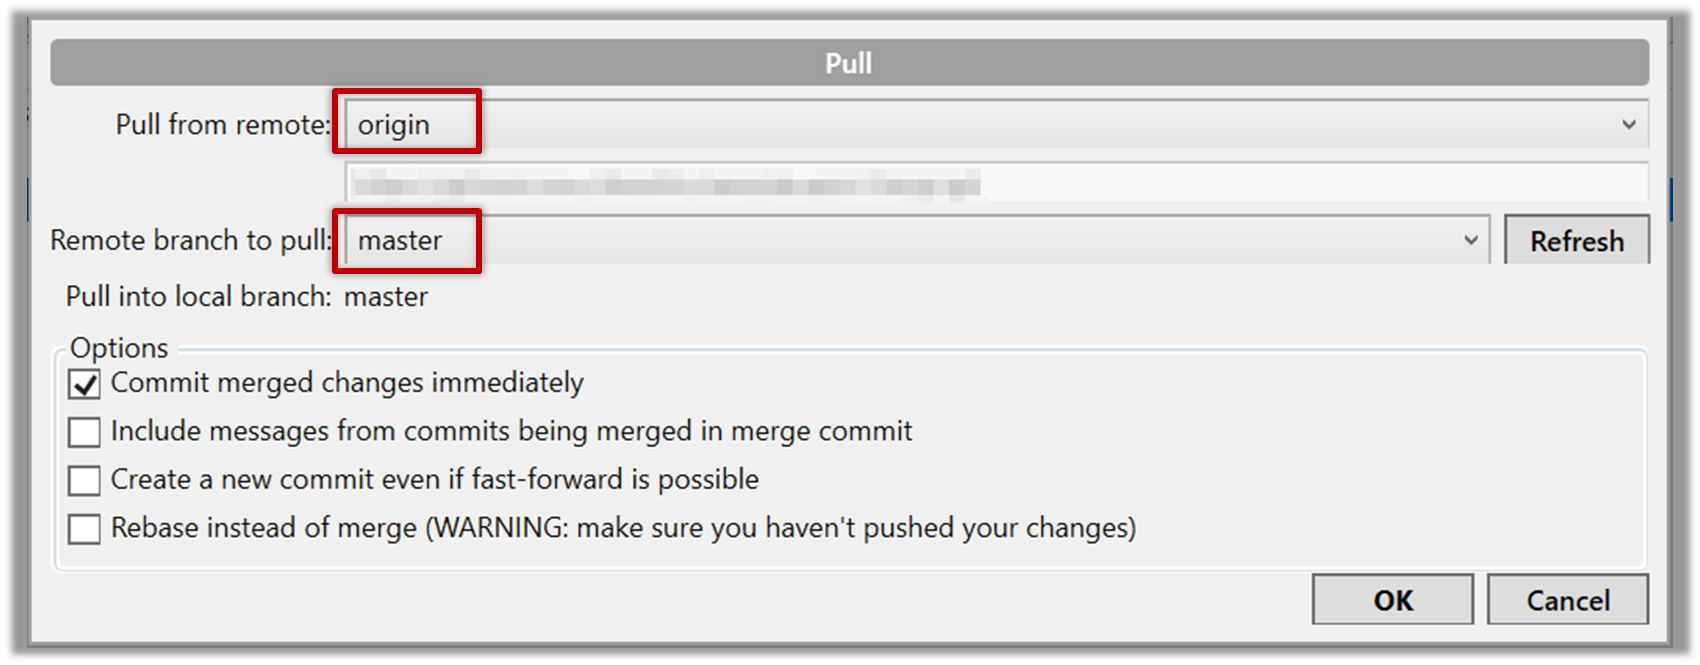
Now, your local repo state is exactly how it would be if you had cloned the repo 2 commits ago, as if somebody has added two more commits to the remote repo since you cloned it. To get those commits to your local repo (i.e. to sync your local repo with upstream repo) you can do a pull.
Click the Pull button in the main menu, choose origin and master in the next dialog, and click OK.
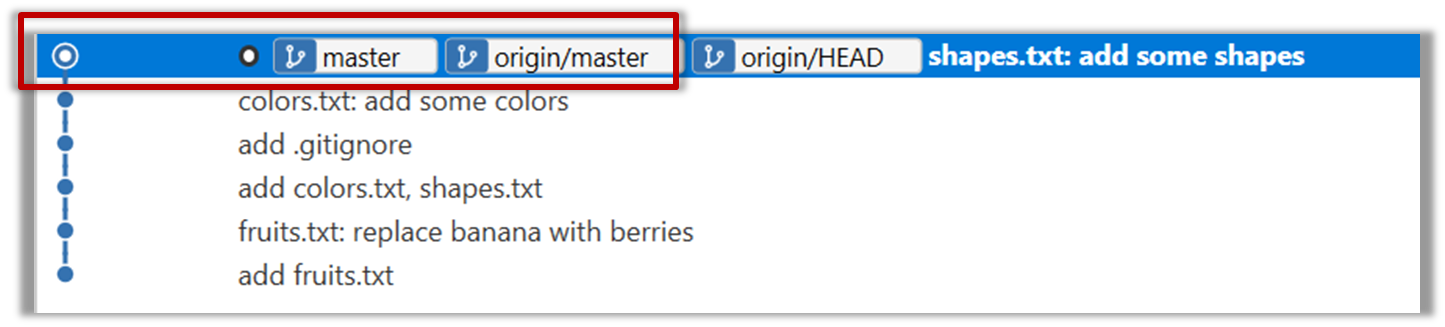
Now you should see something like this where master and origin/master are both pointing the same commit.
git pull origin
Tools → Git and GitHub → Push
Can push to a remote repo
-
Create a GitHub account if you don't have one yet.
-
Fork the samplerepo-things to your GitHub account:
Navigate to the on GitHub and click on the
 button on the top-right corner.
 -
Clone the fork (not the original) to your computer.
-
Create some commits in your repo.
-
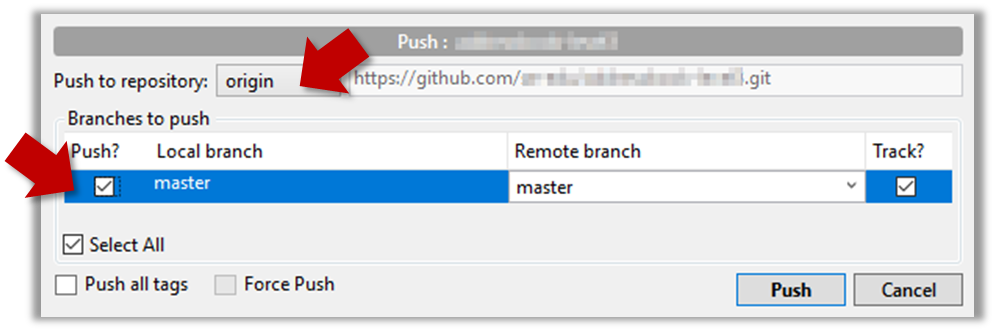
Push the new commits to your fork on GitHub
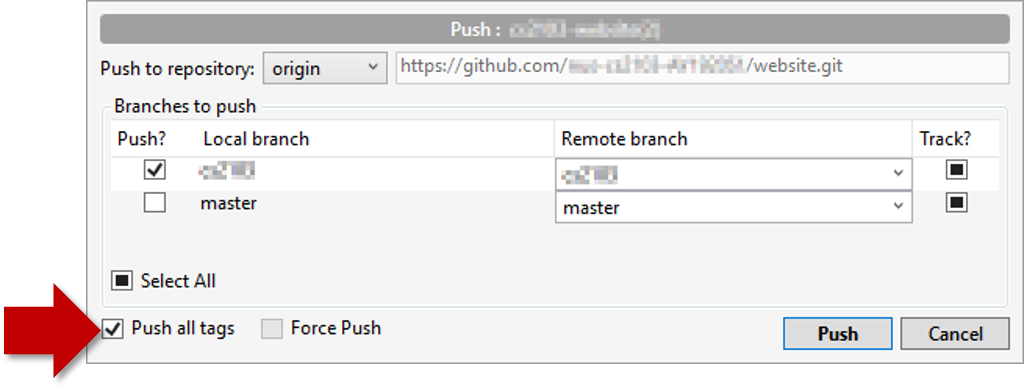
Click the Push button on the main menu, ensure the settings are as follows in the next dialog, and click the Push button on the dialog.
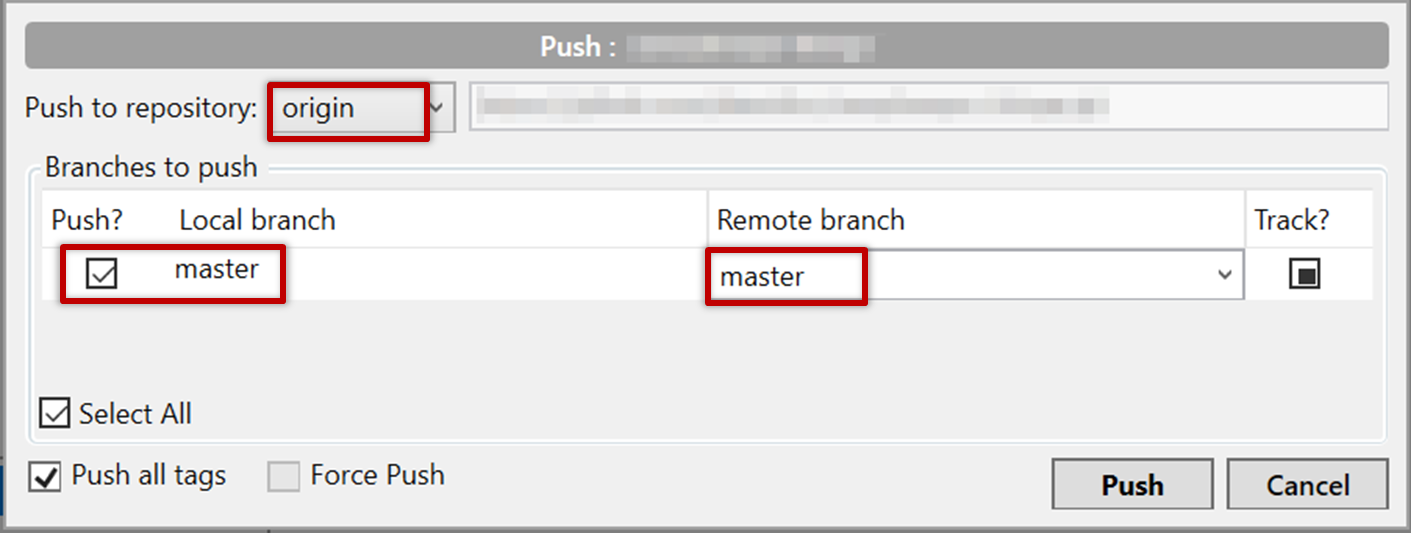
Tags are not included in a normal push. Remember to tick Push all tags when pushing to the remote repo if you want them to be pushed to the repo.
Use the command git push origin master. Enter Github username and password when prompted.
Tags are not included in a normal push. To push a tag, use this command: git push origin <tag_name> e.g.. git push origin v1.0
First, you need to create an empty remote repo on GitHub.
-
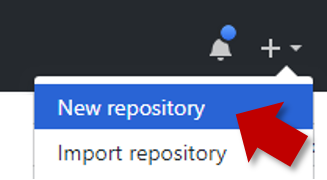
Login to your GitHub account and choose to create a new Repo.
-
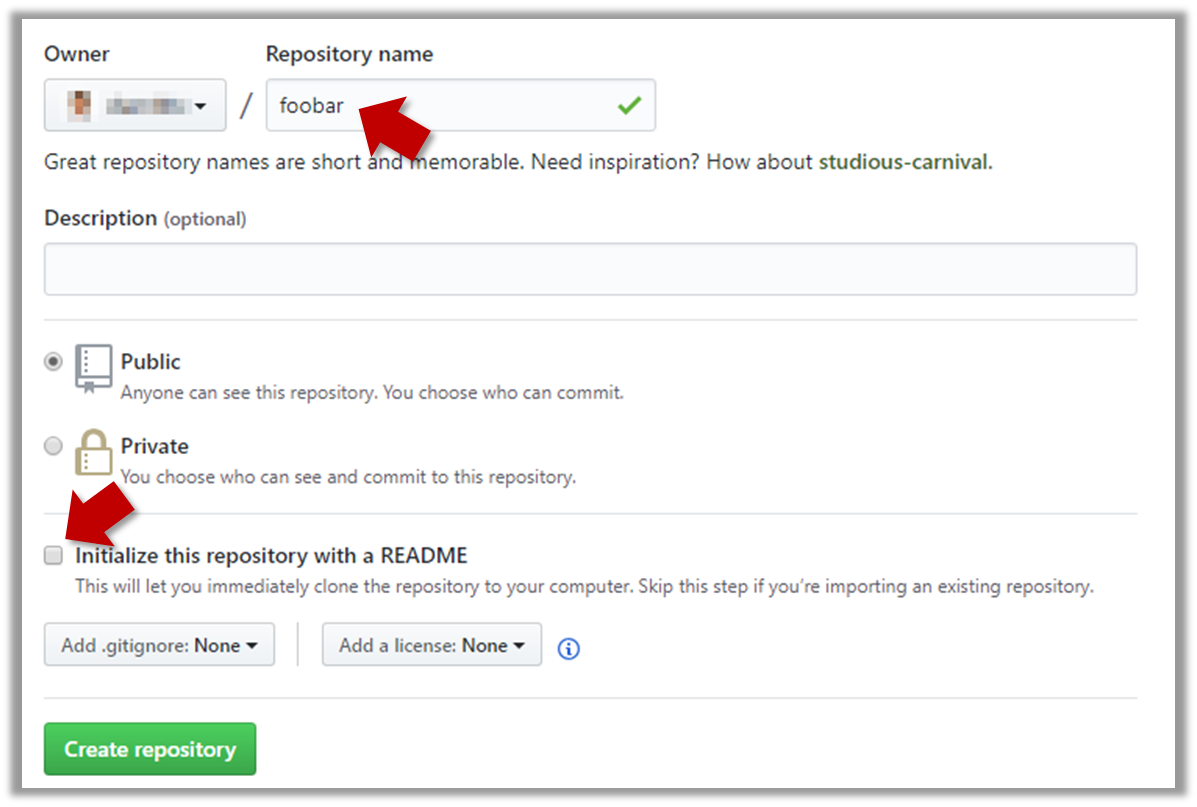
In the next screen, provide a name for your repo but keep the
Initialize this repo ...tick box unchecked.
-
Note the URL of the repo. It will be of the form
https://github.com/{your_user_name}/{repo_name}.git
e.g.,https://github.com/johndoe/foobar.git
Next, you can push the existing local repo to the new remote repo as follows:
- Open the local repo in SourceTree.
- Choose
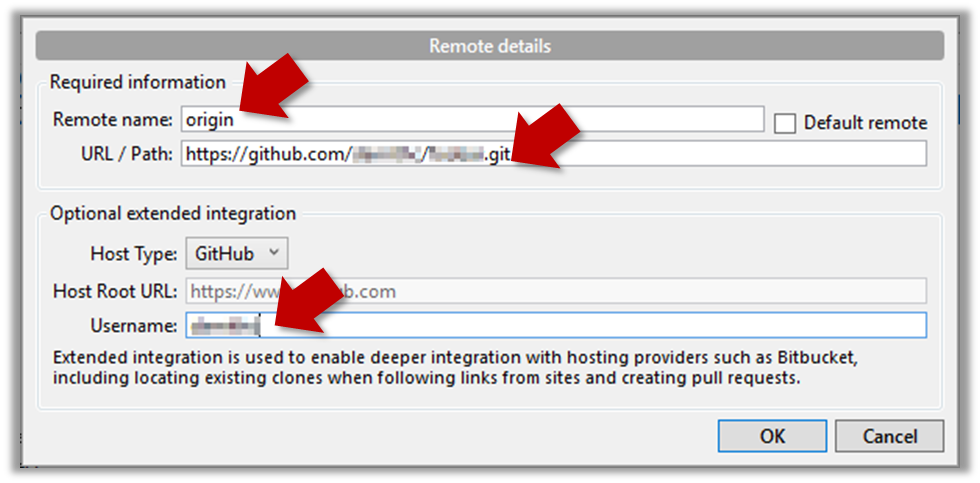
Repository→Repository Settingsmenu option. - Add a new remote to the repo with the following values.
Remote name: the name you want to assign to the remote repo. RecommendedoriginURL/path: the URL of your repo (ending in.git) that you collected earlier.Username: your GitHub username
- Now you can push your repo to the new remote the usual way.
- Navigate to the folder containing the local repo.
- Set the new remote repo as a remote of the local repo.
command:git remote add {remote_name} {remote_repo_url}
e.g.,git remote add origin https://github.com/johndoe/foobar.git - Push to the new remote the usual way. You can use the
-uflag to inform Git that you wish totrack the branch.
e.g.,git push -u origin master
Implementation → IDEs → What
Can explain IDEs
Professional software engineers often write code using Integrated Development Environments (IDEs). IDEs support most development-related work within the same tool (hence, the term integrated).
An IDE generally consists of:
- A source code editor that includes features such as syntax coloring, auto-completion, easy code navigation, error highlighting, and code-snippet generation.
- A compiler and/or an interpreter (together with other build automation support) that facilitates the compilation/linking/running/deployment of a program.
- A debugger that allows the developer to execute the program one step at a time to observe the run-time behavior in order to locate bugs.
- Other tools that aid various aspects of coding e.g. support for automated testing, drag-and-drop construction of UI components, version management support, simulation of the target runtime platform, and modeling support.
Examples of popular IDEs:
- Java: Eclipse, Intellij IDEA, NetBeans
- C#, C++: Visual Studio
- Swift: XCode
- Python: PyCharm
Some Web-based IDEs have appeared in recent times too e.g., Amazon's Cloud9 IDE.
Some experienced developers, in particular those with a UNIX background, prefer lightweight yet powerful text editors with scripting capabilities (e.g. Emacs) over heavier IDEs.
- a. Compiling
- b. Syntax error highlighting
- c. Debugging
- d. Code navigation e.g., to navigate from a method call to the method implementation
- e. Simulation e.g., run a mobile app in a simulator
- f. Code analysis e.g. to find unreachable code
- g. Reverse engineering design/documentation e.g. generate diagrams from code
- h. Visual programming e.g. Write programs using ‘drag and drop’ actions instead of typing code
- i. Syntax assistance e.g., show hints as you type
- j. Code generation e.g., to generate the code required by simply specifying which component/structure you want to implement
- k. Extension i.e., ability add more functionality to the IDE using plugins
All.
Explanation: While all of these features may not be present in some IDEs, most do have these features in some form or other.
Tools → Intellij IDEA → Project Setup
Tools → Intellij IDEA → Code Navigation
Can navigate code effectively using IDE features
Some useful navigation shortcuts:
- Quickly locate a file by name.
- Go to the definition of a method from where it is used.
- Go back to the previous location.
- View the documentation of a method from where the method is being used, without navigating to the method itself.
- Find where a method/field is being used.