TIC2002 (2019)
  • Full Timeline
  • Week 1 [Aug 12]
  • Week 2 [Aug 19]
  • Week 3 [Aug 26]
  • Week 4 [Sep 2]
  • Week 5 [Sep 9]
  • Week 6 [Sep 16]
  • Week 7 [Sep 30]
  • Week 8 [Oct 7]
  • Week 9 [Oct 14]
  • Week 10 [Oct 21]
  • Week 11 [Oct 28]
  • Week 12 [Nov 4]
  • Week 13 [Nov 11]
  • Textbook
  • Admin Info
  • Report Bugs
  • Forum
  • Announcements
  • File Submissions
  • repl.it link
  • Java Coding Standard
  • Duke repo
  • Week 2 [Aug 19] - Topics

    • [W2.1a] Paradigms → OOP → Introduction → What

    • [W2.1b] Paradigms → OOP → Objects → What

    • [W2.1c] Paradigms → OOP → Objects → Objects as Abstractions

    • [W2.1d] Paradigms → OOP → Objects → Encapsulation of Objects

    • [W2.1e] Paradigms → OOP → Classes → What

    • [W2.1f] Paradigms → OOP → Classes → Class-Level Members

    • [W2.2] Java: Objects
    • [W2.2a] C++ to Java → Objects → Using Java Objects

    • [W2.2b] C++ to Java → Objects → Instance Members

    • [W2.2c] C++ to Java → Objects → Passing Objects Around

    • [W2.2d] C++ to Java → Objects → Garbage Collection

    • [W2.3] Java: Classes
    • [W2.3a] C++ to Java → Classes → Defining Classes

    • [W2.3b] C++ to Java → Classes → Getters and setters

    • [W2.3c] C++ to Java → Classes → Class-Level Members

    • [W2.4] Git: Saving History
    • [W2.4a] Project Management → Revision Control → What

    • [W2.4b] Project Management → Revision Control → Repositories

    • [W2.4c] Tools → Git and GitHub → Init

    • [W2.4d] Project Management → Revision Control → Saving History

    • [W2.4e] Tools → Git and GitHub → Commit

    • [W2.4f] Tools → Git and GitHub → Ignore

    • [W2.5] Git: Traversing History
    • [W2.5a] Project Management → Revision Control → Using History

    • [W2.5b] Tools → Git and GitHub → Checkout

    • [W2.5c] Tools → Git and GitHub → Tag

    • [W2.5d] Tools → Git and GitHub → Stash


    [W2.1] OOP: Intro

    W2.1a

    Paradigms → OOP → Introduction → What

    Can describe OOP at a higher level

    Object-Oriented Programming (OOP) is a programming paradigm. A programming paradigm guides programmers to analyze programming problems, and structure programming solutions, in a specific way.

    Programming languages have traditionally divided the world into two parts—data and operations on data. Data is static and immutable, except as the operations may change it. The procedures and functions that operate on data have no lasting state of their own; they’re useful only in their ability to affect data.

    This division is, of course, grounded in the way computers work, so it’s not one that you can easily ignore or push aside. Like the equally pervasive distinctions between matter and energy and between nouns and verbs, it forms the background against which we work. At some point, all programmers—even object-oriented programmers—must lay out the data structures that their programs will use and define the functions that will act on the data.

    With a procedural programming language like C, that’s about all there is to it. The language may offer various kinds of support for organizing data and functions, but it won’t divide the world any differently. Functions and data structures are the basic elements of design.

    Object-oriented programming doesn’t so much dispute this view of the world as restructure it at a higher level. It groups operations and data into modular units called objects and lets you combine objects into structured networks to form a complete program. In an object-oriented programming language, objects and object interactions are the basic elements of design.

    -- Object-Oriented Programming with Objective-C, Apple

    Some other examples of programming paradigms are:

    Paradigm Programming Languages
    Procedural Programming paradigm C
    Functional Programming paradigm F#, Haskel, Scala
    Logic Programming paradigm Prolog

    Some programming languages support multiple paradigms.

    Java is primarily an OOP language but it supports limited forms of functional programming and it can be used to (although not recommended) write procedural code. e.g. se-edu/addressbook-level1

    JavaScript and Python support functional, procedural, and OOP programming.

    A) Choose the correct statements

    • a. OO is a programming paradigm
    • b. OO guides us in how to structure the solution
    • c. OO is mainly an abstraction mechanism
    • d. OO is a programming language
    • e. OO is modeled after how the objects in real world work

    B) Choose the correct statements

    • a. Java and C++ are OO languages
    • b. C language follows the Functional Programming paradigm
    • c. Java can be used to write procedural code
    • d. Prolog follows the Logic Programming paradigm

    A) (a)(b)(c)(e)

    Explanation: While many languages support the OO paradigm, OO is not a language itself.

    B) Choose the correct statement

    (a)(b)(c)(d)

    Explanation: C follows the procedural paradigm. Yes, we can write procedural code using OO languages e.g., AddressBook-level1.

    OO is a higher level mechanism than the procedural paradigm.

    True.

    Explanation: Procedural languages work at simple data structures (e.g., integers, arrays) and functions level. Because an object is an abstraction over data+related functions, OO works at a higher level.

    W2.1b

    Paradigms → OOP → Objects → What

    Can describe how OOP relates to the real world

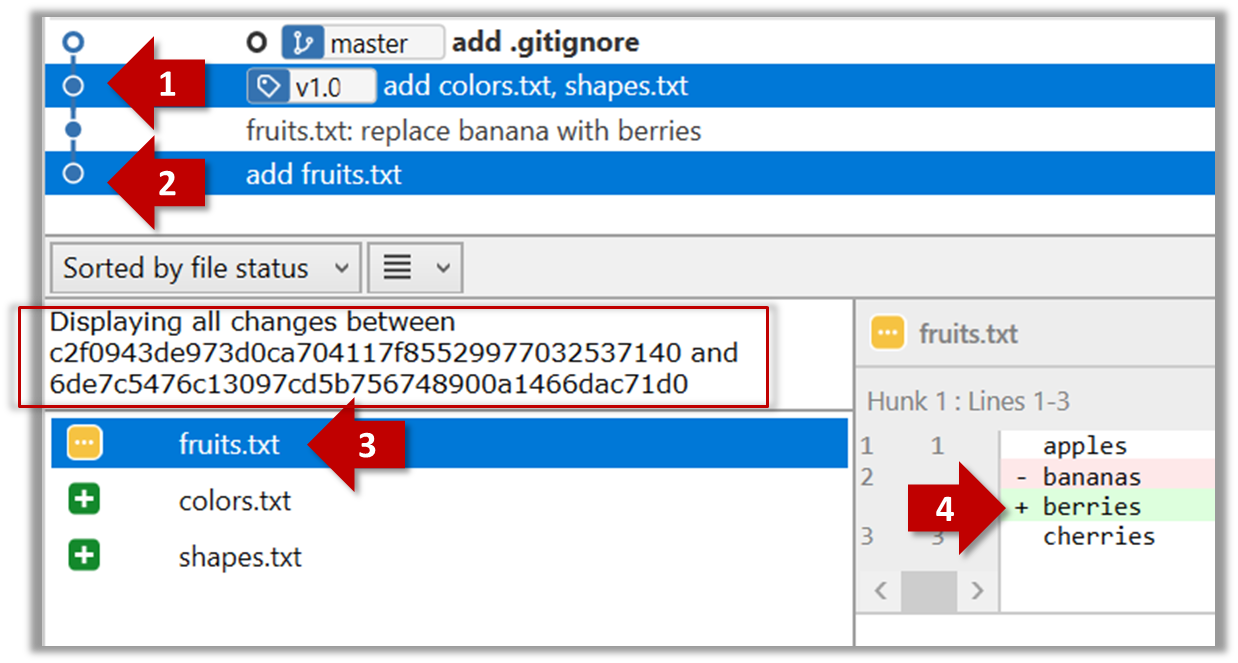
    Every object has both state (data) and behavior (operations on data). In that, they’re not much different from ordinary physical objects. It’s easy to see how a mechanical device, such as a pocket watch or a piano, embodies both state and behavior. But almost anything that’s designed to do a job does, too. Even simple things with no moving parts such as an ordinary bottle combine state (how full the bottle is, whether or not it’s open, how warm its contents are) with behavior (the ability to dispense its contents at various flow rates, to be opened or closed, to withstand high or low temperatures).

    It’s this resemblance to real things that gives objects much of their power and appeal. They can not only model components of real systems, but equally as well fulfill assigned roles as components in software systems.

    -- Object-Oriented Programming with Objective-C, Apple

    Object Oriented Programming (OOP) views the world as a network of interacting objects.

    A real world scenario viewed as a network of interacting objects:

    You are asked to find out the average age of a group of people Adam, Beth, Charlie, and Daisy. You take a piece of paper and pen, go to each person, ask for their age, and note it down. After collecting the age of all four, you enter it into a calculator to find the total. And then, use the same calculator to divide the total by four, to get the average age. This can be viewed as the objects You, Pen, Paper, Calculator, Adam, Beth, Charlie, and Daisy interacting to accomplish the end result of calculating the average age of the four persons. These objects can be considered as connected in a certain network of certain structure.

    OOP solutions try to create a similar object network inside the computer’s memory – a sort of a virtual simulation of the corresponding real world scenario – so that a similar result can be achieved programmatically.

    OOP does not demand that the virtual world object network follow the real world exactly.

    Our previous example can be tweaked a bit as follows:

    • Use an object called Main to represent your role in the scenario.
    • As there is no physical writing involved, we can replace the Pen and Paper with an object called AgeList that is able to keep a list of ages.

    Every object has both state (data) and behavior (operations on data).

    Object Real World? Virtual World? Example of State (i.e. Data) Examples of Behavior (i.e. Operations)
    Adam Name, Date of Birth Calculate age based on birthday
    Pen - Ink color, Amount of ink remaining Write
    AgeList - Recorded ages Give the number of entries, Accept an entry to record
    Calculator Numbers already entered Calculate the sum, divide
    You/Main Average age, Sum of ages Use other objects to calculate

    Every object has an interface and an implementation.

    Every real world object has:

    • an interface through which other objects can interact with it
    • an implementation that supports the interface but may not be accessible to the other object

    The interface and implementation of some real-world objects in our example:

    • Calculator: the buttons and the display are part of the interface; circuits are part of the implementation.
    • Adam: In the context of our 'calculate average age' example, the interface of Adam consists of requests that adam will respond to, e.g. "Give age to the nearest year, as at Jan 1st of this year" "State your name"; the implementation includes the mental calculation Adam uses to calculate the age which is not visible to other objects.

    Similarly, every object in the virtual world has an interface and an implementation.

    The interface and implementation of some virtual-world objects in our example:

    • Adam: the interface might have a method getAge(Date asAt); the implementation of that method is not visible to other objects.

    Objects interact by sending messages. Both real world and virtual world object interactions can be viewed as objects sending message to each other. The message can result in the sender object receiving a response and/or the receiver object’s state being changed. Furthermore, the result can vary based on which object received the message, even if the message is identical (see rows 1 and 2 in the example below).

    Examples:

    World Sender Receiver Message Response State Change
    Real You Adam "What is your name?" "Adam" -
    Real as above Beth as above "Beth" -
    Real You Pen Put nib on paper and apply pressure Makes a mark on your paper Ink level goes down
    Virtual Main Calculator (current total is 50) add(int i): int i = 23 73 total = total + 23

    Consider the following real-world scenario.

    Tom read a Software Engineering textbook (he has been assigned to read the book) and highlighted some of the text in it.

    Explain the following statements about OOP using the above scenario as an example.

    1. Object Oriented Programming (OOP) views the world as a network of interacting objects.
    2. Every object has both state (data) and behavior (operations on data).
    3. Every object has an interface and an implementation.
    4. Objects interact by sending messages.
    5. OOP does not demand that the virtual world object network follow the real world exactly.

    [1] Object Oriented Programming (OOP) views the world as a network of interacting objects.

    Interacting objects in the scenario: Tom, SE Textbook (Book for short), Text, (possibly) Highlighter

    objects usually match nouns in the description

    [2]Every object has both state (data) and behavior (operations on data).

    Object Examples of state Examples of behavior
    Tom memory of the text read read
    Book title show text
    Text font size get highlighted

    [3] Every object has an interface and an implementation.

    • Interface of an object consists of how other objects interact with it i.e., what other objects can do to that object
    • Implementation consist of internals of the object that facilitate the interactions but not visible to other objects.
    Object Examples of interface Examples of implementation
    Tom receive reading assignment understand/memorize the text read, remember the reading assignment
    Book show text, turn page how pages are bound to the spine
    Text read how characters/words are connected together or fixed to the book

    [4] Objects interact by sending messages.

    Examples:

    • Tom sends message turn page to the Book
    • Tom sends message show text to the Book. When the Book shows the Text, Tom sends the message read to the Text which returns the text content to Tom.
    • Tom sends message highlight to the Highlighter while specifying which Text to highlight. Then the Highlighter sends the message highlight to the specified Text.

    [5] OOP does not demand that the virtual world object network follow the real world exactly.

    Examples:

    • A virtual world simulation of the above scenario can omit the Highlighter object. Instead, we can teach Text to highlight themselves when requested.

    W2.1c

    Paradigms → OOP → Objects → Objects as Abstractions

    Can explain the abstraction aspect of OOP

    The concept of Objects in OOP is an abstraction mechanism because it allows us to abstract away the lower level details and work with bigger granularity entities i.e. ignore details of data formats and the method implementation details and work at the level of objects.

    Abstraction is a technique for dealing with complexity. It works by establishing a level of complexity we are interested in, and suppressing the more complex details below that level.

    We can deal with a Person object that represents the person Adam and query the object for Adam's age instead of dealing with details such as Adam’s date of birth (DoB), in what format the DoB is stored, the algorithm used to calculate the age from the DoB, etc.

    W2.1d

    Paradigms → OOP → Objects → Encapsulation of Objects

    Can explain the encapsulation aspect of OOP

    Encapsulation protects an implementation from unintended actions and from inadvertent access.
    -- Object-Oriented Programming with Objective-C, Apple

    An object is an encapsulation of some data and related behavior in terms of two aspects:

    1. The packaging aspect: An object packages data and related behavior together into one self-contained unit.

    2. The information hiding aspect: The data in an object is hidden from the outside world and are only accessible using the object's interface.

    Choose the correct statements

    • a. An object is an encapsulation because it packages data and behavior into one bundle.
    • b. An object is an encapsulation because it lets us think in terms of higher level concepts such as Students rather than student-related functions and data separately.

    Don't confuse encapsulation with abstraction.

    Choose the correct statement

    (a)

    Explanation: The second statement should be: An object is an abstraction encapsulation because it lets ...

    W2.1e

    Paradigms → OOP → Classes → What

    Can explain the relationship between classes and objects

    Writing an OOP program is essentially writing instructions that the computer will uses to,

    1. create the virtual world of of the object network, and
    2. provide it the inputs to produce the outcome we want.

    A class contains instructions for creating a specific kind of objects. It turns out sometimes multiple objects keep the same type of data and have the same behavior because they are of the same kind. Instructions for creating a one kind (or ‘class’) of objects can be done once and that same instructions can be used to instantiate objects of that kind. We call such instructions a Class.

    Classes and objects in an example scenario

    Consider the example of writing an OOP program to calculate the average age of Adam, Beth, Charlie, and Daisy.

    Instructions for creating objects Adam, Beth, Charlie, and Daisy will be very similar because they are all of the same kind : they all represent ‘persons’ with the same interface, the same kind of data (i.e. name, DoB, etc.), and the same kind of behavior (i.e. getAge(Date), getName(), etc.). Therefore, we can have a class called Person containing instructions on how to create Person objects and use that class to instantiate objects Adam, Beth, Charlie, and Daisy.

    Similarly, we need classes AgeList, Calculator, and Main classes to instantiate one each of AgeList, Calculator, and Main objects.

    Class Objects
    Person objects representing Adam, Beth, Charlie, Daisy
    AgeList an object to represent the age list
    Calculator an object to do the calculations
    Main an object to represent you who manages the whole operation

    Consider the following scenario. If you were to simulate this in an OOP program, what are the classes and the objects you would use?

    A customer (name: John) gave a cheque to the Cashier (name: Peter) to pay for the LoTR and GoT books he bought.

    Class Objects
    Customer john
    Book LoTR, GoT
    Cheque checqueJohnGave
    Cashier peter

    Assume you are writing a CLI program called CityConnect for storing and querying distances between cities. The behavior is as follows:

    Welcome to CityConnect!
    
    Enter command: addroute Clementi BuonaVista 12
    Route from Clementi to BuonaVista with distance 12km added
    
    Enter command: getdistance Clementi BuonaVista
    Distance from Clementi to BuonaVista is 12
    
    Enter command: getdistance Clementi JurongWest
    No route exists from Clementi to JurongWest!
    
    Enter command: addroute Clementi JurongWest 24
    Route from Clementi to JurongWest with distance 24km added
    
    Enter command: getdistance Clementi JurongWest
    Distance from Clementi to JurongWest is 24
    
    Enter command: exit


    What classes would you have in your code if you write your program based on the OOP paradigm?

    One class you can have is Route

    W2.1f

    Paradigms → OOP → Classes → Class-Level Members

    Can explain class-level members

    While all objects of a class has the same attributes, each object has its own copy of the attribute value.

    All Person objects have the Name attribute but the value of that attribute varies between Person objects.

    However, some attributes are not suitable to be maintained by individual objects. Instead, they should be maintained centrally, shared by all objects of the class. They are like ‘global variables’ but attached to a specific class. Such variables whose value is shared by all instances of a class are called class-level attributes.

    The attribute totalPersons should be maintained centrally and shared by all Person objects rather than copied at each Person object.

    Similarly, when a normal method is being called, a message is being sent to the receiving object and the result may depend on the receiving object.

    Sending the getName() message to Adam object results in the response "Adam" while sending the same message to the Beth object gets the response "Beth".

    However, there can be methods related to a specific class but not suitable for sending message to a specific object of that class. Such methods that are called using the class instead of a specific instance are called class-level methods.

    The method getTotalPersons() is not suitable to send to a specific Person object because a specific object of the Person class should not know about the total number of Person objects.

    Class-level attributes and methods are collectively called class-level members (also called static members sometimes because some programming languages use the keyword static to identify class-level members). They are to be accessed using the class name rather than an instance of the class.

    Which of these are suitable as class-level variables?

    • a. system: multi-player Pac Man game, Class: Player, variable: totalScore
    • b. system: eLearning system, class: Course, variable: totalStudents
    • c. system: ToDo manager, class: Task, variable: totalPendingTasks
    • d. system: any, class: ArrayList, variable: total (i.e., total items in a given ArrayList object)

    (c)

    Explanation: totalPendingTasks should not be managed by individual Task objects and therefore suitable to be maintained as a class-level variable. The other variables should be managed at instance level as their value varies from instance to instance. e.g., totalStudents for one Course object will differ from totalStudents of another.

    [W2.2] Java: Objects

    W2.2a

    C++ to Java → Objects → Using Java Objects

    Can use in-built Java objects

    Java is an "object-oriented" language, which means that it uses objects to represent data and provide methods related to them. Object types are called classes e.g., you can use String objects in Java and those objects belong to the String class.

    importing

    Java comes with many inbuilt classes which are organized into packages. Here are some examples:

    package Some example classes in the package
    java.lang String, Math, System

    Before using a class in your code, you need to import the class. import statements appear at the top of the code.

    This example imports the java.awt.Point (i.e., the Point class in the java.awt package) class -- which can be used to represent the coordinates of a location in a Cartesian plane -- and use it in the main method.

    In mathematical notation, points are often written in parentheses with a comma separating the coordinates. For example, (0,0) indicates the origin, and (x,y) indicates the point x units to the right and y units up from the origin.

    import java.awt.Point;
    
    public class Main{
        public static void main(String[] args) {
            Point spot = new Point(3, 4);
            int x = spot.x;
            System.out.println(x);
       }
    }
    

    You might wonder why we can use the System class without importing it. System belongs to the java.lang package, which is imported automatically.

    new operator

    To create a new object, you have to use the new operator

    This line shows how to create a new Point object using the new operator:

    Point spot = new Point(3, 4);
    

    Update the code below to create a new Rectangle object as described in the code comments, to produce the given output.

    • The Rectangle class is found in the java.awt package.
    • The parameters you need to supply when creating new Rectangle objects are (int x, int y, int width, int height).
    public class Main {
        public static void main(String[] args) {
            Rectangle r;
    
            // TODO create a Rectangle object that has the properties x=0, y=0, width=5, height=10
            // assign it to r
    
            System.out.println(r);
        }
    }
    

    java.awt.Rectangle[x=0,y=0,width=5,height=10]
    
    • Import the java.awt.Rectangle class
    • This is how you create the required object new Rectangle(0, 0, 5, 10)

    W2.2b

    C++ to Java → Objects → Instance Members

    Can use instance members of objects

    Variables that belong to an object are called attributes (or fields).

    To access an attribute of an object, Java uses dot notation.

    The code below uses spot.x which means "go to the object spot refers to, and get the value of the attribute x."

    Point spot = new Point(3, 4);
    int sum = spot.x * spot.x + spot.y * spot.y;
    System.out.println(spot.x + ", " + spot.y + ", " + sum);
    

    3, 4, 25
    

    You can mutate an object by assigning a different values to its attributes.

    This example changes the x value of the Point object to 5.

    Point spot = new Point(3, 4);
    spot.x = 5;
    System.out.println(spot.x + ", " + spot.y);
    

    5, 4
    

    Java uses the dot notation to invoke methods on an object too.

    This example invokes the translate method on a Point object so that it moves to a different location.

    Point spot = new Point(3, 4);
    System.out.println(spot.x + ", " + spot.y);
    spot.translate(5,5);
    System.out.println(spot.x + ", " + spot.y);
    

    3, 4
    8, 9
    

    Update the code below as described in code comments, to produce the given output.

    import java.awt.Rectangle;
    
    public class Main {
        public static void main(String[] args) {
            Rectangle r = new Rectangle(0, 0, 4, 6);
            System.out.println(r);
    
            int area;
            //TODO: add a line below to calculate the area using width and height properties of r
            // and assign it to the variable area
    
            System.out.println("Area: " + area);
    
            //TODO: add a line here to set the size of r to 8x10 (width x height)
            //Recommended: use the setSize(int height, int width) method of the Rectangle object
    
            System.out.println(r);
        }
    
    }
    

    java.awt.Rectangle[x=0,y=0,width=4,height=6]
    Area: 24
    java.awt.Rectangle[x=0,y=0,width=8,height=10]
    
    • Area can be calculated as r.width * r.height
    • Setting the size can be done as r.setSize(8, 10)

    W2.2c

    C++ to Java → Objects → Passing Objects Around

    Can pass objects between methods

    You can pass objects as parameters to a method in the usual way.

    The printPoint method below takes a Point object as an argument and displays its attributes in (x,y) format.

    public static void printPoint(Point p) {
        System.out.println("(" + p.x + ", " + p.y + ")");
    }
    
    public static void main(String[] args) {
        Point spot = new Point(3, 4);
        printPoint(spot);
    }
    

    3, 4
    

    You can return an object from a method too.

    The java.awt package also provides a class called Rectangle. Rectangle objects are similar to points, but they have four attributes: x, y, width, and height. The findCenter method below takes a Rectangle as an argument and returns a Point that corresponds to the center of the rectangle:

    public static Point findCenter(Rectangle box) {
        int x = box.x + box.width / 2;
        int y = box.y + box.height / 2;
        return new Point(x, y);
    }
    

    The return type of this method is Point. The last line creates a new Point object and returns a reference to it.

    null and NullPointerException

    null is a special value that means "no object". You can assign null to a variable to indicate that the variable is 'empty' at the moment. However, if you try to use a null value, either by accessing an attribute or invoking a method, Java throws a NullPointerException.

    In this example, the variable spot is assigned a null value. As a result, trying to access spot.x attribute or invoke spot.translate method results in a NullPointerException.

    Point spot = null;
    int x = spot.x;          // NullPointerException
    spot.translate(50, 50);  // NullPointerException
    

    On the other hand, it is legal return null from a method or to pass a null reference as an argument to a method.

    Returning null from a method.

    public static Point createCopy(Point p) {
        if (p == null) {
            return null; // return null if p is null
        }
    
        // create a new object with same x,y values
        return new Point(p.x, p.y);
    }
    

    Passing null as the argument.

    Point result = createCopy(null);
    System.out.println(result);
    

    null
    

    It is possible to have multiple variables that refer to the same object.

    Notice how p1 and p2 are aliases for the same object. When the object is changed using the variable p1, the changes are visible via p2 as well (and vice versa), because they both point to the same Point object.

    Point p1 = new Point(0,0);
    Point p2 = p1;
    System.out.println("p1: " + p1.x + ", " + p1.y);
    System.out.println("p2: " + p2.x + ", " + p2.y);
    p1.x = 1;
    p2.y = 2;
    System.out.println("p1: " + p1.x + ", " + p1.y);
    System.out.println("p2: " + p2.x + ", " + p2.y);
    

    p1: 0, 0
    p2: 0, 0
    p1: 1, 2
    p2: 1, 2
    

    Java does not have explicit pointers (and other related things such as pointer de-referencing, pointer arithmetic). When an object is passed into a method as an argument, the method gains access to the original object. If the method changes the object it received, the changes are retained in the object even after the method is completed.

    Note how p3 retains changes done to it by the method swapCoordinates even after the method call.

    public static void swapCoordinates(Point p){
        int temp = p.x;
        p.x = p.y;
        p.y = temp;
    }
    
    public static void main(String[] args) {
        Point p3 = new Point(2,3);
        System.out.println("p3: " + p3.x + ", " + p3.y);
        swapCoordinates(p3);
        System.out.println("p3: " + p3.x + ", " + p3.y);
    }
    
    p3: 2, 3
    p3: 3, 2
    

    Add a method move(Point p, Rectangle r) to the code below, to produce the given output. The behavior of the method is as follows:

    • Returns a new Point object that has attributes x and y that match those of r
    • Does not modify p
    • Updates r so that its attributes x and y match those of p
    • Returns null and does nothing if either p or r is null
    import java.awt.Point;
    import java.awt.Rectangle;
    
    public class Main {
    
        //TODO add your method here
    
        public static void main(String[] args) {
            Point p1 = new Point(0, 0);
            Rectangle r1 = new Rectangle(2, 3, 5, 6);
            System.out.println("arguments: " + p1 + ", " + r1);
    
            Point p2 = move(p1, r1);
            System.out.println("argument point after method call: " + p1);
            System.out.println("argument rectangle after method call: " + r1);
            System.out.println("returned point: " + p2);
    
            System.out.println(move(null, null));
        }
    }
    

    arguments: java.awt.Point[x=0,y=0], java.awt.Rectangle[x=2,y=3,width=5,height=6]
    argument point after method call: java.awt.Point[x=0,y=0]
    argument rectangle after method call: java.awt.Rectangle[x=0,y=0,width=5,height=6]
    returned point: java.awt.Point[x=2,y=3]
    null
    

    Partial solution:

    public static Point move(Point p, Rectangle r){
        if (p == null || r == null){
            // ...
        }
        Point newPoint = new Point(r.x, r.y);
        r.x = p.x;
        // ...
        return newPoint;
    }
    

    W2.2d

    C++ to Java → Objects → Garbage Collection

    Can explain Java garbage collection

    What happens when no variables refer to an object?

    Point spot = new Point(3, 4);
    spot = null;
    

    The first line creates a new Point object and makes spot refer to it. The second line changes spot so that instead of referring to the object, it refers to nothing. If there are no references to an object, there is no way to access its attributes or invoke a method on it. From the programmer’s view, it ceases to exist. However it’s still present in the computer’s memory, taking up space.

    In Java, you don’t have to delete objects you create when they are no longer needed. As your program runs, the system automatically looks for stranded objects and reclaims them; then the space can be reused for new objects. This process is called garbage collection. You don’t have to do anything to make garbage collection happen, and in general don’t have to be aware of it. But in high-performance applications, you may notice a slight delay every now and then when Java reclaims space from discarded objects.

    [W2.3] Java: Classes

    W2.3a

    C++ to Java → Classes → Defining Classes

    Can define Java classes

    As you know,

    • Defining a class introduces a new object type.
    • Every object belongs to some object type; that is, it is an instance of some class.
    • A class definition is like a template for objects: it specifies what attributes the objects have and what methods can operate on them.
    • The new operator instantiates objects, that is, it creates new instances of a class.
    • The methods that operate on an object type are defined in the class for that object.

    Here's a class called Time, intended to represent a moment in time. It has three attributes and no methods.

    public class Time {
        private int hour;
        private int minute;
        private int second;
    }
    

    You can give a class any name you like. The Java convention is to use PascalCase format for class names.

    The code is usually placed in a file whose name matches the class e.g., the Time class should be in a file named Time.java.

    When a class is public (e.g., the Time class in the above example) it can be used in other classes. But the instance variables that are private (e.g., the hour, minute and second attributes of the Time class) can only be accessed from inside the Time class.

    Constructors

    The syntax for constructors is similar to that of other methods, except:

    • The name of the constructor is the same as the name of the class.
    • The keyword static is omitted.
    • Do not return anything. A constructor returns the created object by default.

    When you invoke new, Java creates the object and calls your constructor to initialize the instance variables. When the constructor is done, it returns a reference to the new object.

    Here is an example constructor for the Time class:

    public Time() {
        hour = 0;
        minute = 0;
        second = 0;
    }
    

    This constructor does not take any arguments. Each line initializes an instance variable to zero (which in this example means midnight). Now you can create Time objects.

    Time time = new Time();

    Like other methods, constructors can be overloaded.

    You can add another constructor to the Time class to allow creating Time objects that are initialized to a specific time:

    public Time(int h, int m, int s) {
        hour = h;
        minute = m;
        second = s;
    }
    

    Here's how you can invoke the new constructor: Time justBeforeMidnight = new Time(11, 59, 59);

    this keyword

    The this keyword is a reference variable in Java that refers to the current object. You can use this the same way you use the name of any other object. For example, you can read and write the instance variables of this, and you can pass this as an argument to other methods. But you do not declare this, and you can’t make an assignment to it.

    In the following version of the constructor, the names and types of the parameters are the same as the instance variables (parameters don’t have to use the same names, but that’s a common style). As a result, the parameters shadow (or hide) the instance variables, so the keyword this is necessary to tell them apart.

    public Time(int hour, int minute, int second) {
        this.hour = hour;
        this.minute = minute;
        this.second = second;
    }
    

    this can be used to refer to a constructor of a class within the same class too.

    In this example the constructor Time() uses the this keyword to call its own overloaded constructor Time(int, int, int)

    public Time() {
        this(0, 0, 0); // call the overloaded constructor
    }
    
    public Time(int hour, int minute, int second) {
        // ...
    }
    
    
    Instance methods

    You can add methods to a class which can then be used from the objects of that class. These instance methods do not have the static keyword in the method signature. Instance methods can access attributes of the class.

    Here's how you can add a method to the Time class to get the number of seconds passed till midnight.

    public int secondsSinceMidnight() {
        return hour*60*60 + minute*60 + second;
    }
    

    Here's how you can use that method.

    Time t = new Time(0, 2, 5);
    System.out.println(t.secondsSinceMidnight() + " seconds since midnight!");
    

    Define a Circle class so that the code given below produces the given output. The nature of the class is a follows:

    • Attributes(all private):
      • int x, int y: represents the location of the circle
      • double radius: the radius of the circle
    • Constructors:
      • Circle(): initializes x, y, radius to 0
      • Circle(int x, int y, double radius): initializes the attributes to the given values
    • Methods:
      • getArea(): int
        Returns the area of the circle as an int value (not double). Calculated as 2 * PI * (radius)2
        You can convert to double to an int using (int) e.g., x = (int)2.25 gives x the value 2.
        You can use Math.PI to get the value of Pi
        You can use Math.pow() to raise a number to a specific power e.g., Math.pow(3, 2) calculates 32
    public class Main {
        public static void main(String[] args) {
            Circle c = new Circle();
    
            System.out.println(c.getArea());
            c = new Circle(1, 2, 5);
            System.out.println(c.getArea());
    
        }
    }
    

    0
    78
    
    • Put the Circle class in a file called Circle.java

    Partial solution:

    public class Circle {
        private int x;
        // ...
    
        public Circle(){
            this(0, 0, 0);
        }
    
        public Circle(int x, int y, double radius){
            this.x = x;
            // ...
        }
    
        public int getArea(){
            double area = Math.PI * Math.pow(radius, 2);
            return (int)area;
        }
    
    }
    

    W2.3b

    C++ to Java → Classes → Getters and setters

    Can define getters and setters

    As the instance variables of Time are private, you can access them from within the Time class only. To compensate, you can provide methods to access attributes:

    public int getHour() {
        return hour;
    }
    
    public int getMinute() {
        return minute;
    }
    
    public int getSecond() {
        return second;
    }
    

    Methods like these are formally called “accessors”, but more commonly referred to as getters. By convention, the method that gets a variable named something is called getSomething.

    Similarly, you can provide setter methods to modify attributes of a Time object:

    public void setHour(int hour) {
        this.hour = hour;
    }
    
    public void setMinute(int minute) {
        this.minute = minute;
    }
    
    public void setSecond(int second) {
        this.second = second;
    }
    

    Consider the Circle class below:

    public class Circle {
        private int x;
        private int y;
        private double radius;
    
        public Circle(){
            this(0, 0, 0);
        }
    
        public Circle(int x, int y, double radius){
            this.x = x;
            this.y = y;
            this.radius = radius;
        }
    
        public int getArea(){
            double area = Math.PI * Math.pow(radius, 2);
            return (int)area;
        }
    
    }
    

    Update it as follows so that code given below produces the given output.

    • Add getter/setter methods for all three attributes
    • Update the setters and constructors such that if the radius supplied is negative, the code automatically set the radius to 0 instead.
    public class Main {
        public static void main(String[] args) {
            Circle c = new Circle(1,2, 5);
    
            c.setX(4);
            c.setY(5);
            c.setRadius(6);
            System.out.println("x      : " + c.getX());
            System.out.println("y      : " + c.getY());
            System.out.println("radius : " + c.getRadius());
            System.out.println("area   : " + c.getArea());
    
            c.setRadius(-5);
            System.out.println("radius : " + c.getRadius());
            c = new Circle(1, 1, -4);
            System.out.println("radius : " + c.getRadius());
    
        }
    }
    

    x      : 4
    y      : 5
    radius : 6.0
    area   : 113
    radius : 0.0
    radius : 0.0
    

    Partial solution:

    public Circle(int x, int y, double radius){
        setX(x);
        setY(y);
        setRadius(radius);
    }
    
    public void setRadius(double radius) {
        this.radius = Math.max(radius, 0);
    }
    

    W2.3c

    C++ to Java → Classes → Class-Level Members

    Can use class-level members

    The content below is an extract from -- Java Tutorial, with slight adaptations.

    When a number of objects are created from the same class blueprint, they each have their own distinct copies of instance variables. In the case of a Bicycle class, the instance variables are gear, and speed. Each Bicycle object has its own values for these variables, stored in different memory locations.

    Sometimes, you want to have variables that are common to all objects. This is accomplished with the static modifier. Fields that have the static modifier in their declaration are called static fields or class variables. They are associated with the class, rather than with any object. Every instance of the class shares a class variable, which is in one fixed location in memory. Any object can change the value of a class variable, but class variables can also be manipulated without creating an instance of the class.

    Suppose you want to create a number of Bicycle objects and assign each a serial number, beginning with 1 for the first object. This ID number is unique to each object and is therefore an instance variable. At the same time, you need a field to keep track of how many Bicycle objects have been created so that you know what ID to assign to the next one. Such a field is not related to any individual object, but to the class as a whole. For this you need a class variable, numberOfBicycles, as follows:

    public class Bicycle {
    
        private int gear;
        private int speed;
    
        // an instance variable for the object ID
        private int id;
    
        // a class variable for the number of Bicycle objects instantiated
        private static int numberOfBicycles = 0;
            ...
    }
    

    Class variables are referenced by the class name itself, as in Bicycle.numberOfBicycles This makes it clear that they are class variables.

    The Java programming language supports static methods as well as static variables. Static methods, which have the static modifier in their declarations, should be invoked with the class name, without the need for creating an instance of the class, as in ClassName.methodName(args)

    The static modifier, in combination with the final modifier, is also used to define constants. The final modifier indicates that the value of this field cannot change.For example, the following variable declaration defines a constant named PI, whose value is an approximation of pi (the ratio of the circumference of a circle to its diameter): static final double PI = 3.141592653589793;

    Here is an example with class-level variables and class-level methods:

    public class Bicycle {
    
        private int gear;
        private int speed;
    
        private int id;
    
        private static int numberOfBicycles = 0;
    
    
        public Bicycle(int startSpeed, int startGear) {
            gear = startGear;
            speed = startSpeed;
    
            numberOfBicycles++;
            id = numberOfBicycles;
        }
    
        public int getID() {
            return id;
        }
    
        public static int getNumberOfBicycles() {
            return numberOfBicycles;
        }
    
        public int getGear(){
            return gear;
        }
    
        public void setGear(int newValue) {
            gear = newValue;
        }
    
        public int getSpeed() {
            return speed;
        }
    
        // ...
    
    }
    

    Explanation of System.out.println(...):

    • out is a class-level public attribute of the System class.
    • println is a instance level method of the out object.

    Consider the Circle class below:

    public class Circle {
        private int x;
        private int y;
        private double radius;
    
        public Circle(){
            this(0, 0, 0);
        }
    
        public Circle(int x, int y, double radius){
            setX(x);
            setY(y);
            setRadius(radius);
        }
    
        public int getX() {
            return x;
        }
    
        public void setX(int x) {
            this.x = x;
        }
    
        public int getY() {
            return y;
        }
    
        public void setY(int y) {
            this.y = y;
        }
    
        public double getRadius() {
            return radius;
        }
    
        public void setRadius(double radius) {
            this.radius = Math.max(radius, 0);
        }
    
        public int getArea(){
            double area = Math.PI * Math.pow(radius, 2);
            return (int)area;
        }
    }
    

    Update it as follows so that code given below produces the given output.

    • Add a class-level getMaxRadius method that returns the maximum radius that has been used in all Circle objects created thus far.
    public class Main {
        public static void main(String[] args) {
            Circle c = new Circle();
            System.out.println("max radius used so far : " + Circle.getMaxRadius());
            c = new Circle(0, 0, 10);
            System.out.println("max radius used so far : " + Circle.getMaxRadius());
            c = new Circle(0, 0, -15);
            System.out.println("max radius used so far : " + Circle.getMaxRadius());
            c.setRadius(12);
            System.out.println("max radius used so far : " + Circle.getMaxRadius());
        }
    }
    

    max radius used so far : 0.0
    max radius used so far : 10.0
    max radius used so far : 10.0
    max radius used so far : 12.0
    

    You can use a static variable maxRadius to track the maximum value used for the radius attribute so far.

    Partial solution:

    public void setRadius(double radius) {
        this.radius = Math.max(radius, 0);
        if (maxRadius < this.radius){
            // ...
        }
    }
    

    [W2.4] Git: Saving History

    W2.4a

    Project Management → Revision Control → What

    Can explain revision control

    Revision control is the process of managing multiple versions of a piece of information. In its simplest form, this is something that many people do by hand: every time you modify a file, save it under a new name that contains a number, each one higher than the number of the preceding version.

    Manually managing multiple versions of even a single file is an error-prone task, though, so software tools to help automate this process have long been available. The earliest automated revision control tools were intended to help a single user to manage revisions of a single file. Over the past few decades, the scope of revision control tools has expanded greatly; they now manage multiple files, and help multiple people to work together. The best modern revision control tools have no problem coping with thousands of people working together on projects that consist of hundreds of thousands of files.

    Revision control software will track the history and evolution of your project, so you don't have to. For every change, you'll have a log of who made it; why they made it; when they made it; and what the change was.

    Revision control software makes it easier for you to collaborate when you're working with other people. For example, when people more or less simultaneously make potentially incompatible changes, the software will help you to identify and resolve those conflicts.

    It can help you to recover from mistakes. If you make a change that later turns out to be an error, you can revert to an earlier version of one or more files. In fact, a really good revision control tool will even help you to efficiently figure out exactly when a problem was introduced.

    It will help you to work simultaneously on, and manage the drift between, multiple versions of your project. Most of these reasons are equally valid, at least in theory, whether you're working on a project by yourself, or with a hundred other people.

    -- [adapted from bryan-mercurial-guide

    Mercurial: The Definitive Guide by Bryan O'Sullivan retrieved on 2012/07/11

    RCS: Revision Control Software are the software tools that automate the process of Revision Control i.e. managing revisions of software artifacts.

    Revision: A revision (some seem to use it interchangeably with version while others seem to distinguish the two -- here, let us treat them as the same, for simplicity) is a state of a piece of information at a specific time that is a result of some changes to it e.g., if you modify the code and save the file, you have a new revision (or a version) of that file.

    Revision control software are also known as Version Control Software (VCS), and by a few other names.

    Revision Control Software

    In the context of RCS, what is a Revision? Give an example.

    A revision (some seem to use it interchangeably with version while others seem to distinguish the two -- here, let us treat them as the same, for simplicity) is a state of a piece of information at a specific time that is a result of some changes to it. For example, take a file containing program code. If you modify the code and save the file, you have a new revision (or a version) of that file.

    • a. Help a single user manage revisions of a single file
    • b. Help a developer recover from a incorrect modification to a code file
    • c. Makes it easier for a group of developers to collaborate on a project
    • d. Manage the drift between multiple versions of your project
    • e. Detect when multiple developers make incompatible changes to the same file
    • f. All of them are benefits of RCS

    f

    Suppose You are doing a team project with Tom, Dick, and Harry but those three have not even heard the term RCS. How do you explain RCS to them as briefly as possible, using the project as an example?

    W2.4b

    Project Management → Revision Control → Repositories

    Can explain repositories

    Repository (repo for short): The database of the history of a directory being tracked by an RCS software (e.g. Git).

    The repository is the database where the meta-data about the revision history are stored. Suppose you want to apply revision control on files in a directory called ProjectFoo. In that case you need to set up a repo (short for repository) in ProjectFoo directory, which is referred to as the working directory of the repo. For example, Git uses a hidden folder named .git inside the working directory.

    You can have multiple repos in your computer, each repo revision-controlling files of a different working directly, for examples, files of different projects.

    In the context of RCS, what is a repo?

    W2.4c

    Tools → Git and GitHub → Init

    Can create a local Git repo

    Soon you are going to take your first step in using Git. If you would like to see a quick overview of the full Git landscape before jumping in, watch the video below.

    Install SourceTree which is Git + a GUI for Git. If you prefer to use Git via the command line (i.e., without a GUI), you can install Git instead.

    Suppose you want to create a repository in an empty directory things. Here are the steps:

    Windows: Click FileClone/New…. Click on Create button.
    Mac: New...Create New Repository.

    Enter the location of the directory (Windows version shown below) and click Create.

    Go to the things folder and observe how a hidden folder .git has been created.

    Note: If you are on Windows, you might have to configure Windows Explorer to show hidden files.

    Open a Git Bash Terminal.

    If you installed SourceTree, you can click the Terminal button to open a GitBash terminal.

    Navigate to the things directory.

    Use the command git init which should initialize the repo.

    $ git init
    Initialized empty Git repository in c:/repos/things/.git/
    

    You can use the command ls -a to view all files, which should show the .git directory that was created by the previous command.

    $ ls -a
    .  ..  .git
    

    You can also use the git status command to check the status of the newly-created repo. It should respond with something like the bellow

    git status
    

    # On branch master
    #
    # Initial commit
    #
    nothing to commit (create/copy files and use "git add" to track)
    

    W2.4d

    Project Management → Revision Control → Saving History

    Can explain saving history

    Tracking and Ignoring

    In a repo, we can specify which files to track and which files to ignore. Some files such as temporary log files created during the build/test process should not be revision-controlled.

    Staging and Committing

    Committing saves a snapshot of the current state of the tracked files in the revision control history. Such a snapshot is also called a commit (i.e. the noun).

    When ready to commit, we first stage the specific changes we want to commit. This intermediate step allows us to commit only some changes while saving other changes for a later commit.

    Identifying Points in History

    Each commit in a repo is a recorded point in the history of the project that is uniquely identified by an auto-generated hash e.g. a16043703f28e5b3dab95915f5c5e5bf4fdc5fc1.

    We can tag a specific commit with a more easily identifiable name e.g. v1.0.2

    W2.4e

    Tools → Git and GitHub → Commit

    Can commit using Git

    Create an empty repo.

    Create a file named fruits.txt in the working directory and add some dummy text to it.

    Working directory: The directory the repo is based in is called the working directory.

    Observe how the file is detected by Git.

    The file is shown as ‘unstaged’

    You can use the git status command to check the status of the working directory.

    git status
    

    # On branch master
    #
    # Initial commit
    #
    # Untracked files:
    #   (use "git add <file>..." to include in what will be committed)
    #
    #   a.txt
    nothing added to commit but untracked files present (use "git add" to track)
    

    Although git has detected the file in the working directory, it will not do anything with the file unless you tell it to. Suppose we want to commit the current state of the file. First, we should stage the file.

    Commit: Saving the current state of the working folder into the Git revision history.

    Stage: Instructing Git to prepare a file for committing.

    Select the fruits.txt and click on the Stage Selected button

    fruits.txt should appear in the Staged files panel now.

    You can use the stage or the add command (they are synonyms, add is the more popular choice) to stage files.

    git add fruits.txt
    git status
    

    # On branch master
    #
    # Initial commit
    #
    # Changes to be committed:
    #   (use "git rm --cached <file>..." to unstage)
    #
    #       new file:   fruits.txt
    #
    

    Now, you can commit the staged version of fruits.txt

    Click the Commit button, enter a commit message e.g. add fruits.txt in to the text box, and click Commit

    Use the commit command to commit. The -m switch is used to specify the commit message.

    git commit -m "add fruits.txt"
    

    You can use the log command to see the commit history

    git log
    

    commit 8fd30a6910efb28bb258cd01be93e481caeab846
    Author: … < … @... >
    Date:   Wed Jul 5 16:06:28 2017 +0800
    
      Add fruits.txt
    

    Note the existence of something called the master branch. Git allows you to have multiple branches (i.e. it is a way to evolve the content in parallel) and Git creates a default branch named master on which the commits go on by default.

    Do some changes to fruits.txt (e.g. add some text and delete some text). Stage the changes, and commit the changes using the same steps you followed before. You should end up with something like this.

    Next, add two more files colors.txt and shapes.txt to the same working directory. Add a third commit to record the current state of the working directory.

    • Try Git is an online simulation/tutorial of Git basics. You can try its first few steps to solidify what you learned in this LO.

    W2.4f

    Tools → Git and GitHub → Ignore

    Can set Git to ignore files

    Add a file named temp.txt to the things repo you created. Suppose we don’t want this file to be revision controlled by Git. Let’s instruct Git to ignore temp.txt

    The file should be currently listed under Unstaged files. Right-click it and choose Ignore…. Choose Ignore exact filename(s) and click OK.

    Observe that a file named .gitignore has been created in the working directory root and has the following line in it.

    temp.txt
    

    Create a file named .gitignore in the working directory root and add the following line in it.

    temp.txt
    

    The .gitignore file tells Git which files to ignore when tracking revision history. That file itself can be either revision controlled or ignored.

    • To version control it (the more common choice – which allows you to track how the .gitignore file changed over time), simply commit it as you would commit any other file.
    • To ignore it, follow the same steps we followed above when we set Git to ignore the temp.txt file.

    [W2.5] Git: Traversing History

    W2.5a

    Project Management → Revision Control → Using History

    Can explain using history

    RCS tools store the history of the working directory as a series of commits. This means we should commit after each change that we want the RCS to 'remember' for us.

    To see what changed between two points of the history, you can ask the RCS tool to diff the two commits in concern.

    To restore the state of the working directory at a point in the past, you can checkout the commit in concern. i.e., we can traverse the history of the working directory simply by checking out the commits we are interested in.

    RCS: Revision Control Software are the software tools that automate the process of Revision Control i.e. managing revisions of software artifacts.

    W2.5b

    Tools → Git and GitHub → Checkout

    Can load a specific version of a Git repo

    Git can show you what changed in each commit.

    To see which files changed in a commit, click on the commit. To see what changed in a specific file in that commit, click on the file name.

    git show < part-of-commit-hash >
    

    Example:

    git show 251b4cf
    

    commit 5bc0e30635a754908dbdd3d2d833756cc4b52ef3
    Author: … < … >
    Date:   Sat Jul 8 16:50:27 2017 +0800
    
        fruits.txt: replace banana with berries
    
    diff --git a/fruits.txt b/fruits.txt
    index 15b57f7..17f4528 100644
    --- a/fruits.txt
    +++ b/fruits.txt
    @@ -1,3 +1,3 @@
     apples
    -bananas
    +berries
     cherries
    

    Git can also show you the difference between two points in the history of the repo.

    Select the two points you want to compare using Ctrl+Click.

    The same method can be used to compare the current state of the working directory (which might have uncommitted changes) to a point in the history.

    The diff command can be used to view the differences between two points of the history.

    • git diff : shows the changes (uncommitted) since the last commit
    • git diff 0023cdd..fcd6199: shows the changes between the points indicated by by commit hashes
    • git diff v1.0..HEAD: shows changes that happened from the commit tagged as v1.0 to the most recent commit.

    Git can load a specific version of the history to the working directory. Note that if you have uncommitted changes in the working directory, you need to stash them first to prevent them from being overwritten.

    Tools → Git and GitHub →

    Stash

    You can use the git's stash feature to temporarily shelve (or stash) changes you've made to your working copy so that you can work on something else, and then come back and re-apply the stashed changes later on. -- adapted from this

    Follow this article from SourceTree creators. Note the GUI shown in the article is slightly outdated but you should be able to map it to the current GUI.

    Follow this article from Atlassian.

    Double-click the commit you want to load to the working directory, or right-click on that commit and choose Checkout....

    Click OK to the warning about ‘detached HEAD’ (similar to below).

    The specified version is now loaded to the working folder, as indicated by the HEAD label. HEAD is a reference to the currently checked out commit.

    If you checkout a commit that come before the commit in which you added the .gitignore file, Git will now show ignored fiels as ‘unstaged modifications’ because at that stage Git hasn’t been told to ignore those files.

    To go back to the latest commit, double-click it.

    Use the checkout <commit-identifier> command to change the working directory to the state it was in at a specific past commit.

    • git checkout v1.0: loads the state as at commit tagged v1.0
    • git checkout 0023cdd: loads the state as at commit with the hash 0023cdd
    • git checkout HEAD~2: loads the state that is 2 commits behind the most recent commit

    For now, you can ignore the warning about ‘detached HEAD’.

    Use the checkout <branch-name> to go back to the most recent commit of the current branch (the default branch in git is named master)

    • git checkout master

    W2.5c

    Tools → Git and GitHub → Tag

    Can tag commits using Git

    Let's tag a commit in a local repo you have (e.g. the sampelrepo-things repo)

    Right-click on the commit (in the graphical revision graph) you want to tag and choose Tag…

    Specify the tag name e.g. v1.0 and click Add Tag.

    The added tag will appear in the revision graph view.

    To add a tag to the current commit as v1.0,

    git tag –a v1.0
    

    To view tags

    git tag
    

    To learn how to add a tag to a past commit, go to the ‘Git Basics – Tagging’ page of the git-scm book and refer the ‘Tagging Later’ section.

    Remember to push tags to the repo. A normal push does not include tags.

    # push a specific tag
    git push origin v1.0b
    
    # push all tags
    git push origin --tags
    

    W2.5d

    Tools → Git and GitHub → Stash

    Can use Git to stash files

    You can use the git's stash feature to temporarily shelve (or stash) changes you've made to your working copy so that you can work on something else, and then come back and re-apply the stashed changes later on. -- adapted from this

    Follow this article from SourceTree creators. Note the GUI shown in the article is slightly outdated but you should be able to map it to the current GUI.

    Follow this article from Atlassian.